Sunday, 1 September 2013

Handmade cards

For a while now I have been trying to make cards as often as I can.  I do love giving a card that makes people smile.  I normally start by thinking about the person I am giving the card to and the occasion it is for and then going from there.  I started some time ago by making this card for my friend.

                      
From this first attempt my character cards took on and I have since made quite a few, they can be quite fiddly but the response they get is brilliant and that makes it all worthwhile. Here are some of my favourites.


I also like to attempt to make Christmas cards, these were brilliant but I did have a lot of time to make them so they might not be as good this year.


Aside from cross stitch there are plenty of things that can be added to a card, I have recently taken to crocheting appliqués to add to the front of cards, they can look lovely but I am sure on occasions they can look pretty terrible.  Here is an example of a wedding card I made.


Here is another example of a card with a crocheted cat on the front.  It is for a friend who owns a Bengal and the yarn is perfect for her fur.


Cards can also be made of card (surprise surprise) and with the use of Kate and her tools at Happy Henlow Crafts I created this lovely card for my parents wedding anniversary.


This blog might appear as though it is lacking something but the point of it was to show that if there is not time to make a gift a card can be created from a very small idea and the effect can be fantastic.  It does not take a huge amount of skill, time or talent and the recipients are always so grateful.  It is so much better than spending ridiculous amounts on a card from the Supermarket.


Monday, 26 August 2013

Squirrel Nutkins day out.

A while ago my Mum was told about a knitted tree competition being held throughout the chain of care homes she works for.  I think it is mostly for the residents to knit but my Mum's residents are all rather poorly so not capable of too much knitting.  She therefore has been asking friends and family to get involved and I was asked to make a squirrel.  I have to admit I was rather unenthusiastic but once I started Mr Nutkins I rather enjoyed it.  The pattern involved wrapping stitches which was interesting as it made me think about a different way of heeling socks other than way I do now.  Anyway, here is the delightful Squirrel Nutkins enjoying an acorn whilst chilling in the tree in the front garden.


I hadn't quite finished Mr Nutkins tail when we set off for a picnic this afternoon so he came along with me, I knitted his acorn in the car so he didn't feel too left out while we were tucking into our dinner.

We found a lovely spot by the canal in Zouch where we could watch the boats passing through the lock and the cows wading on the other side.


Squirrel Nutkins spent most of his time asleep in my bag but he did pop out for a quick sit on a bush and a chat with Tom.


From our picnic spot we wandered along the canal the other side of the road through Zouch and had a go at skimming stones.


We also admired the wier and the speed at which the water travelled.  I just love being by water, must be the Piscean in me.


I also stopped to say Hello to these two lovely ducks, they looked very happy chilling on their log although I'm not sure how long they will have it because it was slowly getting closer to the wier.


Saturday, 3 August 2013

A failed yet very successful trip to Holmfirth.

Today I went with some knitting friends, ooh knitting friends, to the Rowan Mill in Holmfirth.  The plan was go to the Rowan Garment sale which is quite simply a sale of all their knitted sample garments.  We set off nice and early from Nottingham and after a few wrong turns, very steep hills, narrow roads and entertainment from frisky cows we made it to the Mill.  In our excitement we ran from the cars and up the stairs to the door.

 
Sadly we were met by this....


Which resulted in some sad faces and a smug Jemma who had made the pre sale yesterday.


We decided not to waste our trip and headed into Holmfirth because as Eleanor says "its good to spread our legs!" I think that was an unfortunate combination of spread our wings and stretch our legs.  We made our way to a tea shop where we had a cream tea and a partook in a little bit of knitting/crochet.


Then we made our way to Up Country to peruse the yarns available.  All of their Rowan Cashsoft was reduced to £2.50 so I got two balls to make something yummy.  I have only just realised that one is 4ply and one DK, oh yarnballs!


Even Eleanor the Anti-Rowan gave in and treated herself.


From here we perused a few little shops where I saw these amazing beaded animals....


....purchased this very appropriate blackboard....


...and saw these rather comical if not a little rude sheep.


By this point we decided a pub lunch was in order, I ordered toad in the hole which was the best toad in the hole I have EVER eaten!

 
Our next stop was the Holmfirth Fabric Mill, a magical little room of some of the most beautiful fabrics.


I decided that it was time I bit the bullet and got my sewing machine out to make myself a skirt.  I have been thinking of doing this for a while now and this fabric convinced me it had to be done, beautiful!


The view from the mill was pretty awesome as well.


Then we headed back into town for a cold drink and an ice lolly in the park before heading home.  Here we got to watch a farmer wrestle these four stubborn sheep back into the van, very amusing.

 
We meandered along the stream where we noticed green kisses and I found a spot to admire.


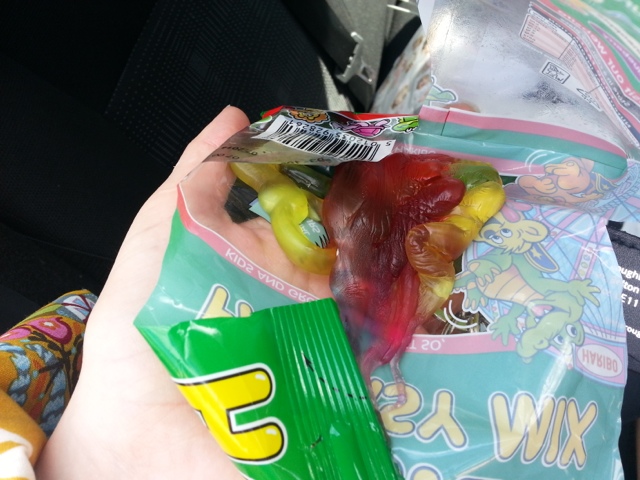
When we got back to the car to drive home it was clear it had been hotter than we thought as the harribo had all merged into one giant harribo.  It was a treat watching Eleanor munch through that I tell you!


All in all a very lovely day.

Thankyou ladies.


Wednesday, 31 July 2013

I haven't blogged this month so here it is!

Since creating my Facebook page I have found I haven't blogged as much.  I think there is the obvious reason that I can post my shorter ramblings on there but I also think this is because I have settled into the land of crafting and whilst I am making a lot I don't feel as though I have learnt anything new in a while.

Since I last blogged I finished a dress using Bamboo Cotton and a wonderful pattern written by Eleanor Burke.  The pattern is quite rightly described as a recipe and that it is.  It can be made wider, shorter, longer and using whatever and however many colours you like.  I did find the pattern a little bit tedious because it is long and a very simple pattern, this does not however detract from the finished garment, just lovely.


Since then I have made a hat, started a jumper, started a cushion, started a cowl, got a bit further with my sock and am now crocheting a shrug.  I am feeling a little bit lost and in need of a beefy project so I think I am going to start an Aran soon.  

I am also hoping to go on an embroidery course soon which has provided an amazing opportunity for me to catch up with a friend from primary school who I haven't seen for years.  Oh how exciting!

Anyway, rambling over and a blog for July written.  Hopefully be back soon.

X

Friday, 28 June 2013

Introducing my new favourite knit!

Let me introduce you to King Cole pattern number 3491.  My first pattern with lace and using cotton and my third ever garment.


I had been eyeing it up for a while but refused to pick up another project until I had used my stash.  This was a terrible idea because I just fell out with knitting, therefore I went and purchased the pattern, some lovely pink yarn and cast on straight away.  It grew pretty quickly and before I knew it I was making the increases.

Here is where I met my first obstacle.  I had never worked with cotton before and found it quite slippy, I worked my increases how I have before but they just looked holey and quite frankly awful so I ripped it back!  I experimented with yarn overs, make ones but eventually settled with making stitches using the cable cast on method, it worked so I stuck with it.

Then I came to the pattern at the top.  To make the bobble the pattern says you are to P3Tog then K1P1K1 all in the next single stitch.  I thought this sounded like it would be easier if I reversed it to K3Tog then P1K1P1... It wasn't and I kept pushing my stitches off the needle when trying to K3Tog.  So it got ripped again and followed as the pattern states.


My next problem was decreasing for the neckline but continuing the pattern, in the end (and with a little advice) I followed the decreases as they are most important and then the pattern fitted around them if it could.  I did make an error in the back and couldn't for the life of me find it so I carried on with it, it has been pointed out to me since but it is so minor I really don't care at all, plus it is on the back so I don't have to look at it.

I cast on the front and got this done an awful lot quicker than the back, that tends to be the way with me, the second half is more exciting because it is the last half.  I worked with the remainder of the ball I had from the front which in hindsight I wish I hadn't.  Somehow I lost a stitch when I introduced the new yarn, I think due to the slipperiness.  I did recover it but something went awry somewhere.  Then when I sewed the ends in it snagged and I have a little imperfection in the front.  I have stitched in some fake stitches to cover the error but I still know it is there which is a little disappointing.


Shortly after starting the back I read a Facebook status from A Stash Addict about how twisting the stitch made from a yarn over closes the hole.  It does and my increases were so much neater this time!
   
Once the front was finished which I have to admit I found a lot easier than the back it was time to pick up to stitch the neckline and armbands and then sew up.  This was all entirely disaster free and completely painless and I have to admit I adore the finished article.


I wore this lovely top to work today with a longer vest underneath.  As I walked to pop some post in an office I was stopped to be told how lovely it was.  I was over the moon, I announced excitedly "I made it!" and then a long conversation about knitting ensued.  Such a big compliment.  Nothing quite like wearing handmade clothes that people envy.  It was also pointed out that the bobbles look like raspberries, they really do, just lovely.

I would highly recommend this pattern to anybody looking for a simple but slightly challenging knit, it provided me with many opportunities to try to fix things and learn about knitting with cotton and a lace pattern.  It combines simple stocking stitch with a more detailed lace stitch.  I am acutely aware there are much more complicated lace patterns but for a first attempt this is a nice achievable target.  The pattern on the other side of the leaflet is quite nice so watch this space as there may be another one in the making.

Happy Stitching. X

Thursday, 20 June 2013

Peter Cushion

Last Saturday I was sat chatting to Eleanor when I spotted a reduced ball of Cygnet Grousemoor Chunky.  The colour was just perfect for my lounge (when it is finished) so I thought I would have it, despite being on a strict no more yarn diet.

I had in mind a little cushion that was in the loft with a cover made of what used to be this top.  This photo is at least 7yrs old now...wow!


Anyway...this did not go in any room so it was time to revamp it to use again so I got started.


I had to look up the gauge for the yarn which was 12 stitches for every 4" on 5-5.5mm needles.  From here I surmised I would need to cast on approximately 40 on 6mm needles.  I probably should have cast on 45 to be honest though.  

Once I had cast on I decided on a cable pattern.  I split the 40 stitches up into 2 blocks of 10 at the edge and a block of 20 in the middle and decided on smaller cable two to the fronts on the edges and a larger cable five to the back in the centre.  Then I knitted until I had almost run out.

It was a bit of a squeeze to fit the cushion in, the cover is pulled quite tight however I quite like this effect...more than I thought I would...because it pulls out the cables and makes the cushion feel very sturdy.

And here it is.


I put my scissors in to give some perspective as one ball certainly wouldn't make a big cushion.

As for the name, a colleague suggested I name my cushion Peter after the actor Peter Cushing so I did.


Wednesday, 12 June 2013

Bath fizzies!

It's probably a well known fact by now that I love a relaxing soak in the tub.  Probably not so widely known that I did an aromatherapy course a couple of years ago and LOVED it!  I learnt a lot but I won't bang on about it too much.  Just after the course I was sent a recipe to make bath fizzies, lovely little blocks of smelly, fizzy delightfulness.  Here is the recipe for you to try. Very easy and they make great, cheap and exciting homemade gifts. 

The recipe calls for citric acid which can only be purchased from chemists in small amounts due to the fact it is used to bulk up illegal drugs, just a warning incase you plan on buying more than one box, don't want you being looked at like a dodgy drug dealer when in actual fact you are making smelly bath fizzies.  As for the essential oils, be sure to choose a smell you like, this can be absolutely anything and most essential oils can be picked up cheaply and easily, my fave combo is lavender, geranium and bergamot.  If you are suffering any ill health or are pregnant then please be careful or just don't make these as essential oils can have a surprising effect.  Maybe some cosmetic grade fragrances would be a better idea.

Scented Bath fizzies

Makes around 25
Takes 30 mins (plus 36-60 hours drying time)

100g cornflour
300g bicarbonate of soda
200g citric acid (available from chemists)
Essential oil
Small spray bottle
Food colouring (optional)
Ice cube tray
Old jam jar with screw lid

1. Sieve the cornflower and bicarbonate of soda into a large bowl, add the citric acid and mix with a stainless steel spoon.  Add the essential oil, one drop at a time until you are happy with the mixtures smell.  Keep stirring the mixture as you add the oil.

2. Fill the spray bottle with water and if you want coloured bath fizzies add a few drops of food colouring to it.  Spritz the mixture lightly with the water, stirring after each spritz until damp.  Squeeze a little of the mixture into your hand and if it holds together, it’s ready for use.  If not, spritz and stir again until the mixture bonds together.  If it starts fizzing, it means you have added too much water and will have to start again.

3. Spoon the mixture into an ice-cube tray and leave at room temperature overnight.  Pop the cubes out of the tray and leave a further 24 – 48 hours to harden at room temperature, then transfer to a clean jam jar.

4. Cover the jars lid with a piece of pretty paper just bigger than the lid and glue in place on the underside.  Screw on the lid and attach a label with the following instructions:
‘add two tablets to your bath water and watch them fizz!’